Non-Metallic Metal is the technique of painting shiny metal surfaces using only matte paints — no metallic pigments. The result, done well, looks more convincing than actual metallic paint because it mimics the way real polished metal reflects light rather than just scattering it.
It sounds backwards. Why avoid metallic paint to paint metal? Because metallic paints scatter light in every direction, regardless of your light source — they look shiny from any angle. Real polished metal reflects your environment directionally. NMM replicates that directionality with careful placement of highlights and shadows.
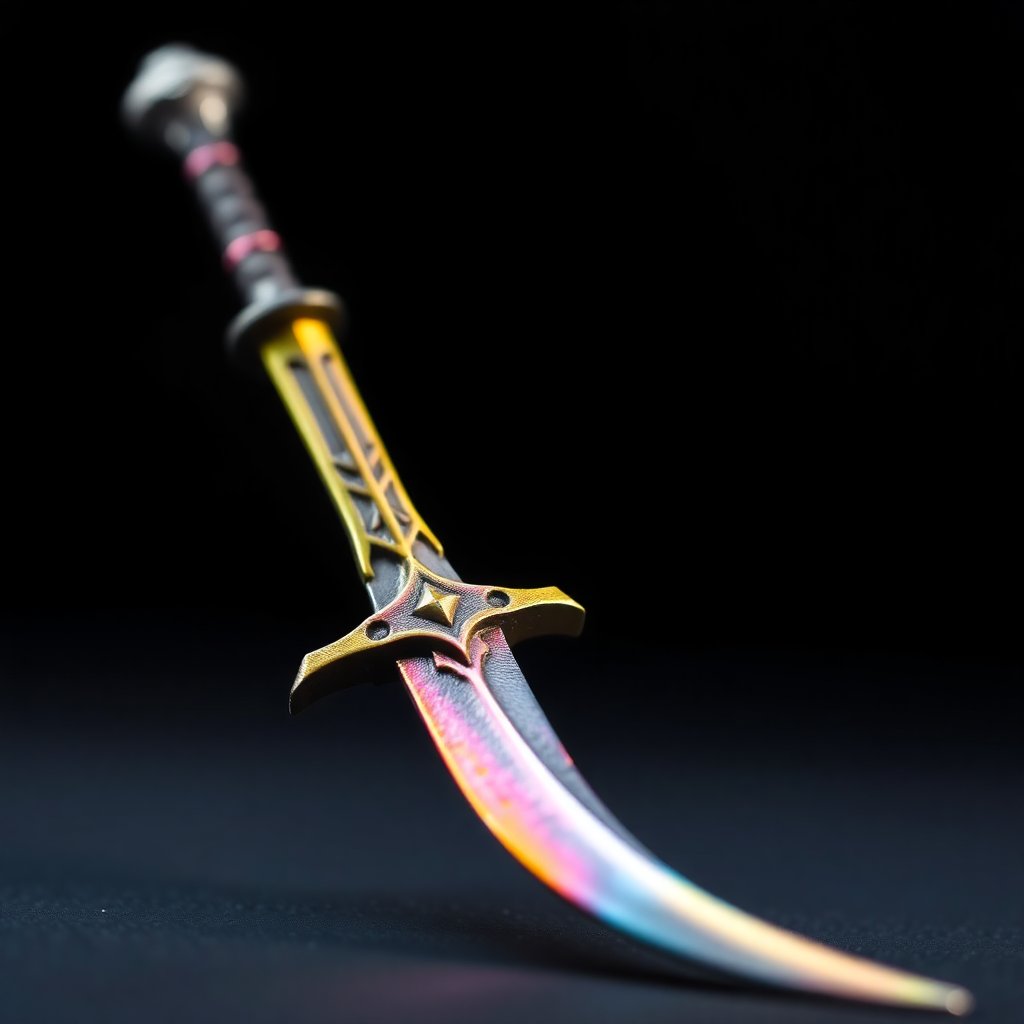
What NMM Actually Looks Like
The key is contrast. Polished metal has extreme value contrast — almost pure white highlights next to near-black shadows, with very little mid-tone. The transition between light and shadow is sharp rather than gradual.
The other key is shape. Light on a curved metal surface has a specific character: a bright specular highlight at the point closest to the light source, transitioning hard to dark on the shadow side. If you've ever looked at a chrome ball bearing, you've seen the shape NMM tries to recreate.
What You Need Before Starting
NMM is not a beginner technique. Before attempting it:
- Be comfortable with layering. You need to be able to place small amounts of paint precisely and build up value smoothly.
- Understand a colour wheel. Metallic surfaces reflect colour from their surroundings. Gold reflects warm oranges; silver reflects cooler blues and greys.
- Have a wet palette. NMM requires fine control over paint consistency. A dry palette makes this much harder.
If you can't yet blend two tones together smoothly, practice that first. NMM is controlled blending at high contrast. Master the basics of how to paint eyes first — that level of brush control translates directly to NMM precision.
Paints You'll Need
For NMM, you're working with regular matte/satin paints — specifically, you need a range of values from near-black to near-white for each metal type.
For Gold NMM:
- Deep shadow: Rhinox Hide or Doombull Brown
- Mid-tone shadow: Snakebite Leather or Balor Brown
- Main tone: Averland Sunset or Yriel Yellow
- Highlight: Flash Gitz Yellow
- Specular highlight: White Scar or pure white
For Silver NMM:
- Deep shadow: Abaddon Black or Eshin Grey
- Mid-tone shadow: Mechanicus Standard Grey
- Main tone: Dawnstone or Administratum Grey
- Highlight: Ulthuan Grey
- Specular highlight: White Scar
→ Shop Citadel base and layer paints for NMM on Amazon
The Basic Approach: Gold NMM
Gold NMM uses warm browns, yellows, and whites. A simple recipe:
- Basecoat with a mid-brown (Rhinox Hide or similar)
- Shadow with near-black in the deepest recesses
- Mid-tone with a golden yellow (Averland Sunset, Yriel Yellow)
- Highlight with a warm orange-yellow (Flash Gitz Yellow)
- Specular highlight with pure white at the brightest point
The specular highlight is what sells it. A single tiny spot of pure white, placed exactly where the light source would create the strongest reflection, creates the illusion of a polished surface.
Don't rush the specular highlight. It's the last step, and it transforms everything that came before it. Place it confidently — a small, defined dot or short line, not a gradual smear.
The Basic Approach: Silver NMM
Silver NMM uses cool greys and whites. A simple recipe:
- Basecoat with mid-grey (Mechanicus Standard Grey)
- Shadow with near-black (Abaddon Black or Eshin Grey)
- Mid-tone with lighter grey (Dawnstone)
- Highlight with off-white (Ulthuan Grey)
- Specular highlight with pure white
The shadow on silver NMM is important — it needs to go close to pure black. The contrast between your darkest dark and brightest highlight is what creates the impression of reflectivity. Many beginners don't go dark enough in the shadows, and the result looks grey rather than metallic.
Where to Place Light and Shadow
Understanding where highlights and shadows go is more important than the specific paints you use.
Light source: Decide where your light source is before you start. Most painters use a top-left source — light comes from the upper left. This is the same convention as studio photography and what your eye is conditioned to read as "correct."
Highlight placement: Highlights go on surfaces that face the light source — tops of raised areas, edges facing up and to the left, the highest points of any curve.
Shadow placement: Shadows go in recesses, under overhangs, and on surfaces that face away from the light source.
The reflection at the bottom: This is the advanced trick. Real metal reflects light from the ground below it. A thin highlight along the very bottom edge of a metal surface — cooler and lighter than you'd expect — creates the illusion of environmental reflection. It's the detail that separates competent NMM from exceptional NMM.
Common Mistakes
Too much mid-tone. NMM fails when it looks gradual rather than stark. The transition from dark to light needs to be abrupt. Push your contrast harder than feels natural.
Specular highlight in the wrong place. The brightest point should be where the light source most directly hits a convex surface facing the viewer. Think about your light source first, then place highlights accordingly.
Forgetting reflected colour. Pure gold NMM can look washed out without some orange and warm-red in the deepest areas. Real gold reflects warm environmental colours. Add a touch of red-orange to your shadow transitions.
Blending too smoothly. The transition from light to dark on polished metal can be almost a hard edge. Don't smooth everything.
Not enough contrast. The single most common NMM mistake. Your darks need to be darker than feels right, and your lights need to be lighter. Push to the extremes.
NMM Comparison: Gold vs Silver
| Element | Gold NMM | Silver NMM | |---|---|---| | Shadow color | Near-black brown | Near-black grey | | Mid-tone | Golden yellow | Mid grey | | Highlight | Warm yellow-orange | Off-white | | Specular | Pure white | Pure white | | Reflected light | Warm orange-red | Cool blue-white | | Difficulty | Medium | Medium-hard |
Complementary Tools
A wet palette is non-negotiable for NMM. You need to keep multiple tones wet simultaneously and blend them smoothly. The Redgrass Games Evomini or the Masterson Sta-Wet are both excellent choices.
→ Shop wet palettes for miniature painting on Amazon
A good brush. NMM requires precise placement of tiny highlights. A size 0 with a sharp point (Winsor & Newton Series 7, Raphael 8404) makes the work possible. A brush that's lost its point will undermine your technique regardless of how well you understand the theory.
→ Shop Kolinsky detail brushes for miniature painting on Amazon
Reference photos. Look at photos of real polished metal objects — chrome automotive parts, polished gold jewelry, stainless steel kitchen equipment. Study where the highlights and shadows fall. NMM is observation as much as technique.
Where to Practice
Don't practice NMM on a model you care about. Buy a few cheap resin models with large, simple armour surfaces — Space Marines work well for this. A flat pauldron is a better practice surface than a detailed sword.
Alternatively, buy a few Grey Knight sprues — the terminator armour has large, relatively flat surfaces that are perfect for practicing NMM before committing to a full model.
Once you can do a convincing pauldron, transfer the technique to more complex surfaces. The principles are always the same: dark shadows, bright highlights, stark contrast, specular spot.
FAQ: Non-Metallic Metal
How long does it take to learn NMM? Expect 3–6 months of regular practice to produce results you're proud of. The learning curve is steep initially, then flattens as the theory clicks. Most painters see a major breakthrough around the first time they nail a specular highlight correctly.
Can I mix NMM and true metallic metal on the same model? The community calls this "hybrid metallic metal" (HMM). It's a legitimate approach — NMM on large visible surfaces, TMM on fine details and chain links where NMM would be impractical. Many award-winning models use this approach.
What's the difference between NMM and glazing metallic areas? Glazing metallic areas means applying a thinned paint over metallic paint to add color shift or depth. This is a different technique — it works with metallic pigment rather than simulating metal from matte colors. NMM uses no metallic paint at all.
Should beginners learn NMM early? Not as a priority. Learn brush control, thinning, shading, and highlighting first. NMM is an advanced application of those fundamentals. If you're struggling with smooth blending on regular colors, NMM will be frustrating. Build the foundations first.
Are there videos that show the process in real time? Yes. YouTube channels by Vince Venturella, Goobertown Hobbies, and Sergio Calvo (who is considered one of the best NMM painters in the world) all have detailed NMM tutorials. Watch several before attempting it yourself — seeing the brush strokes in motion teaches things that written instructions can't.
Conclusion
NMM is the technique that separates good painters from great ones — not because it's the only skill that matters, but because mastering it requires mastering the fundamentals: light theory, contrast control, brush precision, and patience. The models that make you stop scrolling and look twice are often models with exceptional NMM.
It takes time. Practice on surfaces you don't care about. Push your contrast further than feels natural. Place that specular highlight with confidence. The result, when it works, is worth the effort.
Ready to try? Check our hobby space setup guide to make sure your workspace is equipped for fine detail work.
As an Amazon Associate we earn from qualifying purchases. This article contains affiliate links; if you buy through them we may earn a small commission at no additional cost to you.